If you want to measure the success of your website or online marketing efforts, you need to track your website’s goal conversions. Google Analytics (GA4) is a powerful tool that allows you to track and measure website metrics, including goal conversions. Let’s explore how to set up goal conversion tracking on Google Analytics with Google Tag Manager.
Table of Contents
In this article, we will show you how to set up goal conversion tracking on Google Analytics (GA4) with Google Tag Manager.
What is Conversion Tracking on Google Analytics?
Conversion tracking on Google Analytics is the process of tracking the actions that users take on your website that result in a desired outcome, such as making a purchase, filling out a form, or signing up for a newsletter. By tracking these actions, you can measure the effectiveness of your website and marketing campaigns, and identify areas where you may need to make improvements to increase your conversion rate.
Google Analytics provides several tools for tracking conversions, such as goals and ecommerce tracking. Goals allow you to track specific actions that users take on your website, such as visiting a particular page, spending a certain amount of time on your site, or completing a form. Ecommerce tracking, on the other hand, allows you to track revenue, transactions, and other ecommerce-related metrics on your website.
To set up conversion tracking in Google Analytics, you need to define your goals and create conversion events that are triggered when users complete those goals. You can set up conversion tracking in Google Analytics using various methods, including Google Tag Manager, Google Analytics tracking code, and third-party plugins.
Related: Set up a landing page or an opt-in form with Convertkit to capture emails or leads
Steps to Set Up Goal Conversion Tracking on Google Analytics
Google Analytics (GA4) is a powerful tool that allows you to track user behavior on your website.
Here’re the steps to set up goal conversion tracking:
Step 1: Create Your Goals in Google Analytics (GA4)
Before you can start tracking your goals, you need to define them in Google Analytics. To do this, go to your GA4 account and navigate to the “Admin” section. From there, click on “Goals” and then click on the “+ Create Goal” button.
You’ll be prompted to choose a goal type. GA4 provides several options, such as revenue, acquisition, and engagement. Choose the goal type that best aligns with your business objectives.
Once you’ve chosen your goal type, give your goal a name and add any additional information that you’d like to track, such as a destination URL or a specific event. You can create multiple goals in GA4, so make sure to create goals for each of the key actions that you want to track on your website.
Step 2: Set Up Google Tag Manager
Google Tag Manager is a free tool that allows you to easily add tracking tags to your website without needing to modify your website’s code. If you haven’t already set up Google Tag Manager, you’ll need to do that before you can track goals in GA4.
To set up Google Tag Manager, go to the Google Tag Manager website and sign in with your Google account. Follow the instructions to create your account, container, and tags.
Step 3: Add Your GA4 Tracking Tag to Google Tag Manager
To track goals in GA4 using Google Tag Manager, you’ll need to add your GA4 tracking tag to your Google Tag Manager container.
To do this, go to the “Tags” section of your Google Tag Manager container and click on the “+ New” button. Choose “Google Analytics: GA4 Configuration” from the list of tag templates.
You’ll be prompted to enter your GA4 tracking ID, which you can find in your GA4 account. Make sure that you’ve set up your GA4 account correctly and that you’re using the correct tracking ID.
Step 4: Set Up Your GA4 Conversion Event in Google Tag Manager
Once you’ve added your GA4 tracking tag to Google Tag Manager, you can start tracking your goals by setting up conversion events.
To set up a conversion event, go to the “Triggers” section of your Google Tag Manager container and click on the “+ New” button. Choose “Custom Event” from the list of trigger templates.
You’ll need to give your conversion event a name and specify the conditions that trigger the event. For example, if you want to track purchases on your website, you might set the trigger to fire when a user clicks the “Buy Now” button.
Step 5: Test Your Tracking
Before you start using your tracking tags, it’s important to test them to make sure that they’re working correctly. To do this, use Google’s Tag Assistant Chrome extension to check that your GA4 tracking tag and conversion event are firing correctly.
Once you’ve confirmed that your tracking tags are working correctly, you can start collecting data on your website’s conversion rate.
In conclusion, setting up goal conversion tracking on Google Analytics (GA4) using Google Tag Manager is a powerful way to track user behavior on your website
and gain insights into how to improve your website’s performance. By tracking key actions that users take on your site, you can identify areas where you may be losing potential customers and make changes to improve the user experience and increase your conversion rate.
Tips to Keep in Mind While Setting Up Conversion Tracking
Some additional tips to keep in mind when setting up goal conversion tracking on GA4 with Google Tag Manager include:
1. Make sure to use descriptive and meaningful names for your goals and conversion events. This will make it easier to identify and analyze the data in your GA4 reports.
2. Consider setting up funnels for your conversion events. Funnels allow you to track the steps that users take leading up to a conversion event, which can help you identify areas where users may be dropping off.
3. Use the “Enhanced Ecommerce” feature in GA4 to track additional metrics related to user behavior on your site, such as product views and cart abandonment.
Regularly review your GA4 reports to identify trends and patterns in user behavior. Use this data to inform your website optimization strategy and make data-driven decisions.
Related: How to Use Custom Social Icons in a HubSpot Email Template
Types of Goals to Set Up for Conversion Tracking on Google Analytics
There are four types of goals you can set up:
- Destination – Tracks when a user reaches a specific page on your website.
- Duration – Tracks when a user spends a certain amount of time on your website.
- Pages/Screens per Session – Tracks when a user views a certain number of pages on your website.
- Event – Tracks when a user performs a specific action on your website, such as clicking a button or submitting a form.
Example to Set Up Goals for Conversion Tracking on Google Analytics
Now, make a list of all the events you want to track and proceed with each by creating a Tag and respective Trigger.
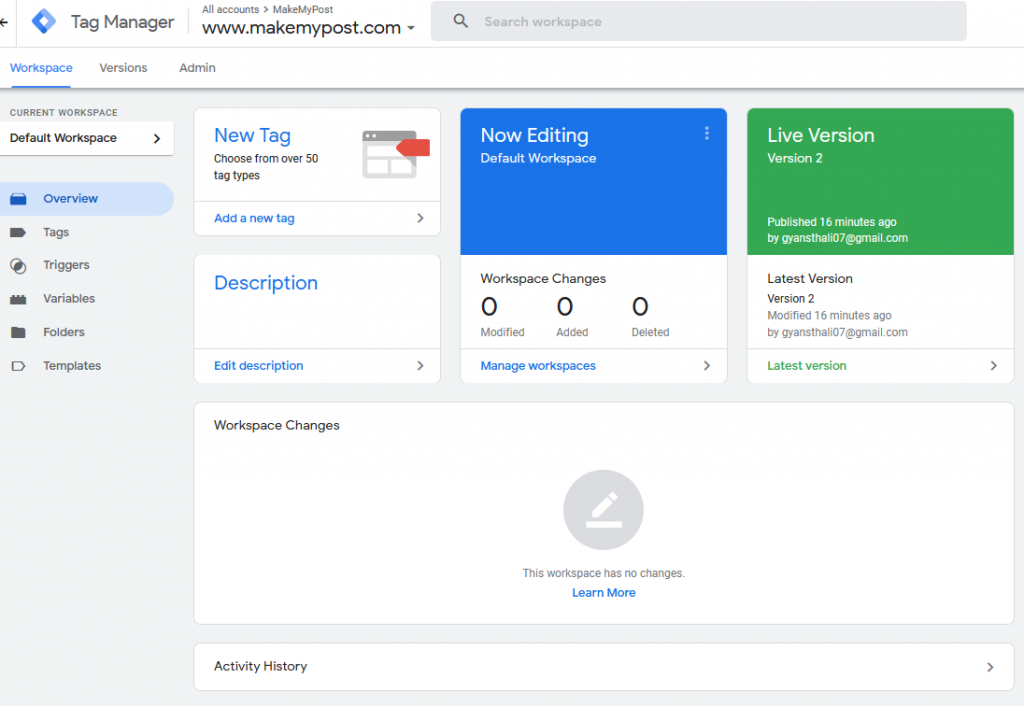
Login to your Google Tag Manager Account
Select the account type >> Workspace and proceed with the tag configurations.
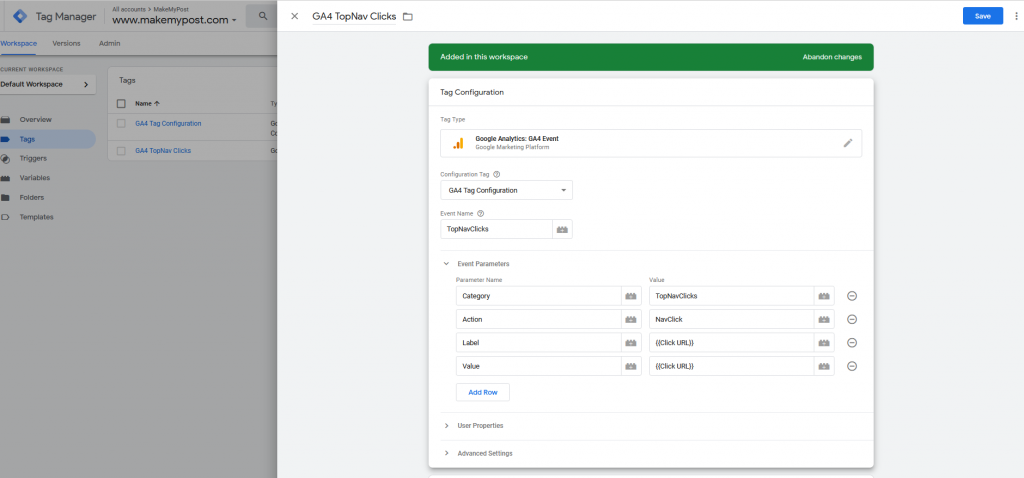
Add an GA4 Event Tag
Click on Tags or Add a new Tag

Change “Untitled Tag” to “GA4 Tag Configuration” and click on Tag Configuration
Choose Tag type from the available list Google Analytics: GA4 Event

Name this tag “GA4 Top Nav Clicks”
Select the “configuration tag” field, select the Tag configuration you had created earlier https://makemypost.com/how-to-add-google-tag-manager-script-on-your-website/ and ensure that the tag configuration is getting triggered on all pages.
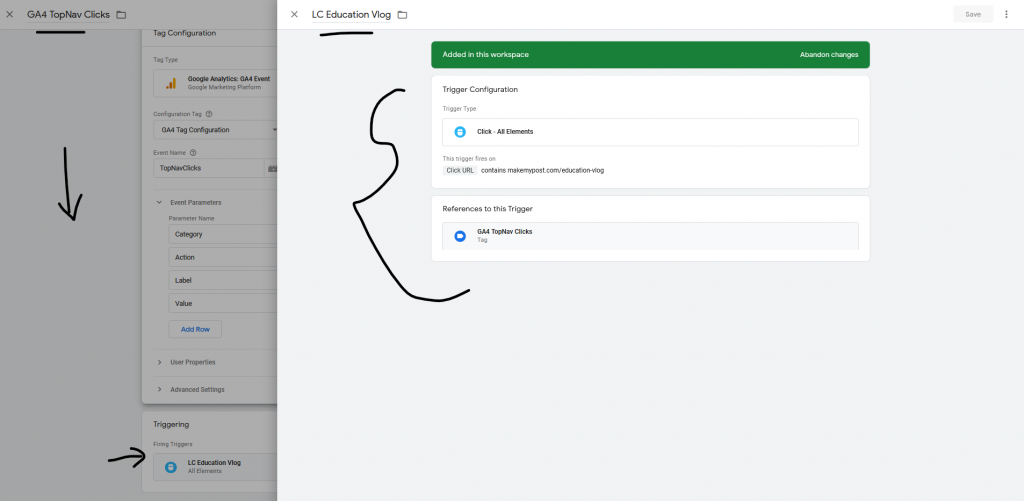
Now, in the triggering section, select Trigger type “Click- All Elements” and name it as “LC Education Vlog”
And, make the configurations as shown below:

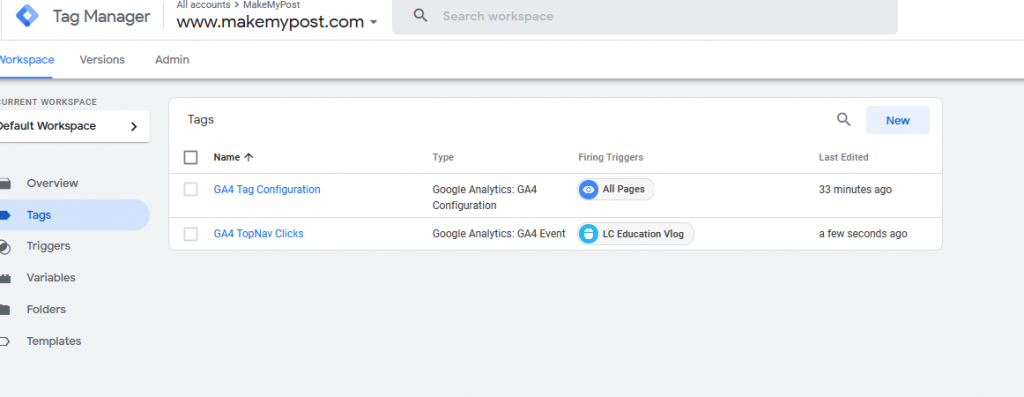
Save the changes, you will see something like this on your screen.

Click Preview to test the changes you have made before publishing.
Once tested and verified. Click on Publish to make the changes live.
Related: How to Implement Infinite Pagination in WordPress?
Importance of Setting Up Conversion Tracking
Setting up conversion tracking is important for several reasons, including:
1. Measuring the effectiveness of your website and marketing campaigns
Conversion tracking allows you to measure the success of your website and marketing efforts by tracking the actions that users take on your site that result in a desired outcome.
By measuring your conversion rate and other key performance metrics, you can identify areas where you may need to make improvements to increase your ROI.
2. Identifying areas for improvement
Conversion tracking provides valuable data and insights into how users interact with your website. By analyzing this data, you can identify areas where users may be dropping off or experiencing issues, and make changes to improve the user experience and increase your conversion rate.
3. Making data-driven decisions
By tracking your website’s conversion rate and other key performance metrics, you can make data-driven decisions about how to optimize your website and marketing campaigns.
This can help you allocate your resources more effectively and ultimately increase your ROI.
4. Comparing the effectiveness of different marketing channels
Conversion tracking allows you to compare the effectiveness of different marketing channels, such as social media, email marketing, and paid search.
By measuring the conversion rates and other metrics for each channel, you can determine which channels are most effective and allocate your marketing budget accordingly.
5. Improving customer retention
Conversion tracking can also help you improve customer retention by identifying areas where users may be experiencing issues or frustrations.
By making changes to improve the user experience, you can increase customer satisfaction and loyalty.
Also read: How to Implement Next and Previous Article Navigation Link With Title
Conclusion
In conclusion, to set up goal conversion tracking on Google Analytics (GA4) using Google Tag Manager can provide valuable insights into the performance of your website and marketing campaigns.
By defining your goals and creating conversion events, you can measure the success of your website and marketing efforts, identify areas for improvement, and make data-driven decisions to optimize your website and increase your ROI.


